
Transforming your bathroom into a sanctuary often involves attention to even the smallest details. One such detail that can make a significant impact is your bathtub side panel. While often overlooked, custom-made front panels can add both functionality and style to your bathing space.

In this step-by-step guide, we'll walk you through the process of creating your own bathtub side panel, from choosing the right materials to customizing the design to fit your aesthetic preferences. Whether you're a seasoned DIY enthusiast or just looking to add a personal touch to your bathroom, this step-by-step tutorial on creating a wooden bath panel will empower you to elevate your bathing experience with a bespoke end panel that reflects your unique taste and style.
This post contains affiliate links and I may receive a small commission if you visit a link and buy something. Purchasing via an affiliate link doesn't cost you any extra, and I only recommend products and services I trust. I may have been sent some of the products in this post free of charge or paid to feature them here. Thank you for supporting this blog.
Jump to:
A while ago we had a leak coming from the bathroom - well we've had a few leaks (apparently they come with a Victorian house). Consequently we've pulled the bath panel off enough times to need a new one. As with everything in our house, it was impossible to source acrylic panels that fitted correctly and we were budget conscious too so I decided to make our own long panel to use as a bath panel. I'm going to share with you in this post how to make your own bathtub side panel so if you don't have a standard bathtub and need to replace the front panel, this post is for you!
Materials you will need
- Tape measure
- MDF wooden panels
- Wallpaper sample
- Wallpaper paste
- Clear varnish
- Floor edging
- No More Nails

Instructions
You will need to measure the size that you need the bath panel to be and have a piece of MDF cut to that correct size. If you aren't into wood work and DIY the easiest way is to get someone to do this for you. We had this done in B&Q but many a hardware store and DIY shops will cut MDF sheet material to size for you.
You will then need a wallpaper that goes with the theme of your bathroom and is a similar style. The wallpaper will be running along the side of your bath so bear that in mind when looking at different patterns. Consider the colours of the rest of the bathroom - the sides of the tub itself, the toilet seat and the walls too. There's no need to buy a whole roll, ask a friend for their wallpaper leftovers or ask for a sample from a wallpaper store.
Use the wallpaper paste to fix the wallpaper to the MDF panel and when dry trim off any excess from the edge of the bath panel. The best way to go about this is to balance the MDF panel on a flat surface such as a wallpapering table or protected dining table.
Then you will want to make the panel water-resistant by varnishing it. I would recommend multiple thin layers of clear varnish - at least 4, leaving it to dry between coats.
Then fix the side bath panel in place to the tub surround and side walls using No More Nails (a strong wood glue). To make it extra secure you could also use wood screws but we didn't find it necessary. Ours was fixed nicely to the wooden frame underside of the bath. Neaten the edges by edging with floor edge strips, again stuck down with No More Nails. Do the same around any connecting skirting boards and wall tile. Edges can be made watertight using silicone sealant. If you aren't confident with this step, find someone who fits bath panels.

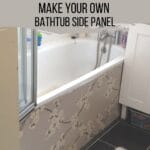
The Result
I was really pleased with the finished effect of this make your own bathtub side panel. We actually did this a few months ago so it has stood the test of use with wet, splashy bath times! People always comment on it when they see the bathroom too as it is so unusual. It's a great way to update your bathroom too as you only have to change the old bath panel to make a big impact.
Pro Tips & Warnings
- Water Damage: Even slight leaks or splashes can damage unprotected wood over time. Take extra care sealing edges and joints.
- Measuring Mistakes: Always measure twice (or three times!) before cutting. A small miscalculation can throw off the entire panel alignment.
- Tool Safety: Power tools can be dangerous. Use proper eye and ear protection, and follow manufacturer instructions for safe operation.
- Ventilation: If you're painting or sealing indoors, ensure the room is well-ventilated to avoid inhaling fumes.
Following these tips and being mindful of common pitfalls will help ensure your DIY bath panel project is both beautiful and built to last.

Make Your Own Bathtub Side Panel FAQs
What is a bathtub side panel and why replace it?
It is the main panel that goes alongside your tub - along the length of your bath. It is usually an acrylic bath panel and basically functions as an access panel so that you can get to the plumbing under the bath still, but not have it on display.
You might want to replace the side panel of a bath if yours has got damaged or is old. It might be that if you have an old tub you aren't able to find a matching and fitting new bath panel so making one is a great option and means that you won't need to replace the whole bath. It's an effective way of saving money and making good of what you already have.
Bathtubs come in all different sizes, standard baths are a myth I think! If you have an old house like ours everything is slightly wonky so you might want to make your own bath panel as standard ones are made for straight baths! You can make a side panel to the exact measurements if you follow this tutorial. It is expensive to buy a new tub, especially if the tub itself is in good condition and it is only the side of your tub that needs to be replaced.
How much did it cost?
As we only had to buy the MDF panels and trim this was a really budget option and came in at about £15. The other bits and pieces we already had in our DIY arsenal. I'd definitely recommend making your own bathtub side panel - it really adds something special to the room and is very budget friendly. It also didn't take a lot of time - it is not a big project and this is a DIY that you could complete in a couple of hours, excluding drying time.
What materials are best for a bath panel?
It depends on your bathroom style and budget, but moisture-resistant MDF or marine-grade plywood are popular choices. Both are sturdy, affordable, and relatively easy to work with. You can also opt for PVC panels if you're looking for a fully waterproof option. Just make sure to choose materials specifically labeled as water-resistant or moisture-resistant.
How do I waterproof a DIY bath panel?
There are several ways to keep your bath panel protected against moisture. First, use a water-resistant material as the base. Second, apply a waterproof primer or sealant on all exposed edges-especially where water might pool. Finally, ensure that any seams or joints are sealed with silicone or a high-quality caulk. This multi-layer approach prevents water damage and prolongs the life of your panel.
Can I paint or tile a bath panel?
Absolutely. Painting is the simpler option-just use a durable, water-resistant paint formulated for bathrooms, and apply a primer first to help it adhere. Tiling adds a more finished look but requires extra steps like applying tile backer board or a similar base if your material isn't sufficiently rigid. Make sure to seal all grout lines properly to prevent water infiltration.
More bath panel ideas...
If you are clever you could attach the side panel in such a way so that it affixes to the rim of the bath in a way that gives you easy access and you can make the most of the little bit of storage space that there often is underneath the bath. You could construct a storage area out of timber frame. Maybe use hinges and create doors with a separate plinth that can be opened to reveal the space underneath. This has the added benefit of making it easier to get to the pipes in case of a leak, which trust me is a great idea.
Did you find this post about how to make your own bathtub side panel useful? Share it with your friends and Pin it for later.
Shop This Post
 Buy Now →
  Buy Now →
  Buy Now →
  Buy Now →
  Buy Now →
You might also like these posts...


gayle says
Planning something similar so good to see one that has been done. Was thinking of using heavy duty velcro just in case I need to get under the bath
cookiesandcwtches says
That would be a good idea!